スマートフォンの光センサーの値を取得して表示する
前回はAndroidスマホの光センサーの有無を確認して、画面上に表示してみた。今回は光センサーの値を取得して、画面上にさせてみる。
環境
開発PC環境
Windows 10
Android Studio 4.1.1
実行Android環境
機種:Xperia X Performance SOV33
Androidバージョン:7.0
Kotlinのコードとレイアウト
今回は参考文献の公式ドキュメントのサンプルコードを参考に、MainActivityのコードを以下のように書いた。前回の光センサーの有無の表示はそのまま残し、センサー値の表示を追加する形にした。
This file contains bidirectional Unicode text that may be interpreted or compiled differently than what appears below. To review, open the file in an editor that reveals hidden Unicode characters.
Learn more about bidirectional Unicode characters
package com.example.checksensorvalue | |
import android.content.Context | |
import android.hardware.Sensor | |
import android.hardware.SensorEvent | |
import android.hardware.SensorEventListener | |
import android.hardware.SensorManager | |
import androidx.appcompat.app.AppCompatActivity | |
import android.os.Bundle | |
import android.widget.TextView | |
class MainActivity : AppCompatActivity(), SensorEventListener { | |
private lateinit var sensorManager: SensorManager | |
private var mLight: Sensor? = null | |
override fun onCreate(savedInstanceState: Bundle?) { | |
super.onCreate(savedInstanceState) | |
setContentView(R.layout.activity_main) | |
sensorManager = getSystemService(Context.SENSOR_SERVICE) as SensorManager | |
mLight = sensorManager.getDefaultSensor(Sensor.TYPE_LIGHT) | |
} | |
override fun onAccuracyChanged(sensor: Sensor, accuracy: Int) { | |
} | |
override fun onSensorChanged(event: SensorEvent) { | |
val lux = event.values[0] | |
val textViewValue = findViewById<TextView>(R.id.textViewValue).apply {text = | |
"光センサー値:" + lux.toString() | |
} | |
} | |
override fun onResume() { | |
super.onResume() | |
mLight?.also { light -> | |
sensorManager.registerListener(this, light, SensorManager.SENSOR_DELAY_NORMAL) | |
} | |
val textViewExist = findViewById<TextView>(R.id.textViewExist) | |
if (sensorManager.getDefaultSensor(Sensor.TYPE_LIGHT) != null) { | |
// 光センサーがある場合 | |
textViewExist.apply {text = "光センサー:あり"} | |
} else { | |
// 光センサーがない場合 | |
textViewExist.apply {text = "光センサー:なし"} | |
} | |
} | |
override fun onPause() { | |
super.onPause() | |
sensorManager.unregisterListener(this) | |
} | |
} |
こちらがレイアウトのxml。
This file contains bidirectional Unicode text that may be interpreted or compiled differently than what appears below. To review, open the file in an editor that reveals hidden Unicode characters.
Learn more about bidirectional Unicode characters
<?xml version="1.0" encoding="utf-8"?> | |
<androidx.constraintlayout.widget.ConstraintLayout xmlns:android="http://schemas.android.com/apk/res/android" | |
xmlns:app="http://schemas.android.com/apk/res-auto" | |
xmlns:tools="http://schemas.android.com/tools" | |
android:layout_width="match_parent" | |
android:layout_height="match_parent" | |
tools:context=".MainActivity"> | |
<TextView | |
android:id="@+id/textViewExist" | |
android:layout_width="wrap_content" | |
android:layout_height="wrap_content" | |
android:layout_marginTop="16dp" | |
android:text="光センサーの有無" | |
app:layout_constraintEnd_toEndOf="parent" | |
app:layout_constraintHorizontal_bias="0.498" | |
app:layout_constraintStart_toStartOf="parent" | |
app:layout_constraintTop_toTopOf="parent" /> | |
<TextView | |
android:id="@+id/textViewValue" | |
android:layout_width="wrap_content" | |
android:layout_height="wrap_content" | |
android:layout_marginTop="16dp" | |
android:text="光センサー値" | |
app:layout_constraintEnd_toEndOf="parent" | |
app:layout_constraintHorizontal_bias="0.498" | |
app:layout_constraintStart_toStartOf="parent" | |
app:layout_constraintTop_toBottomOf="@+id/textViewExist" /> | |
</androidx.constraintlayout.widget.ConstraintLayout> |
動かしてみた結果
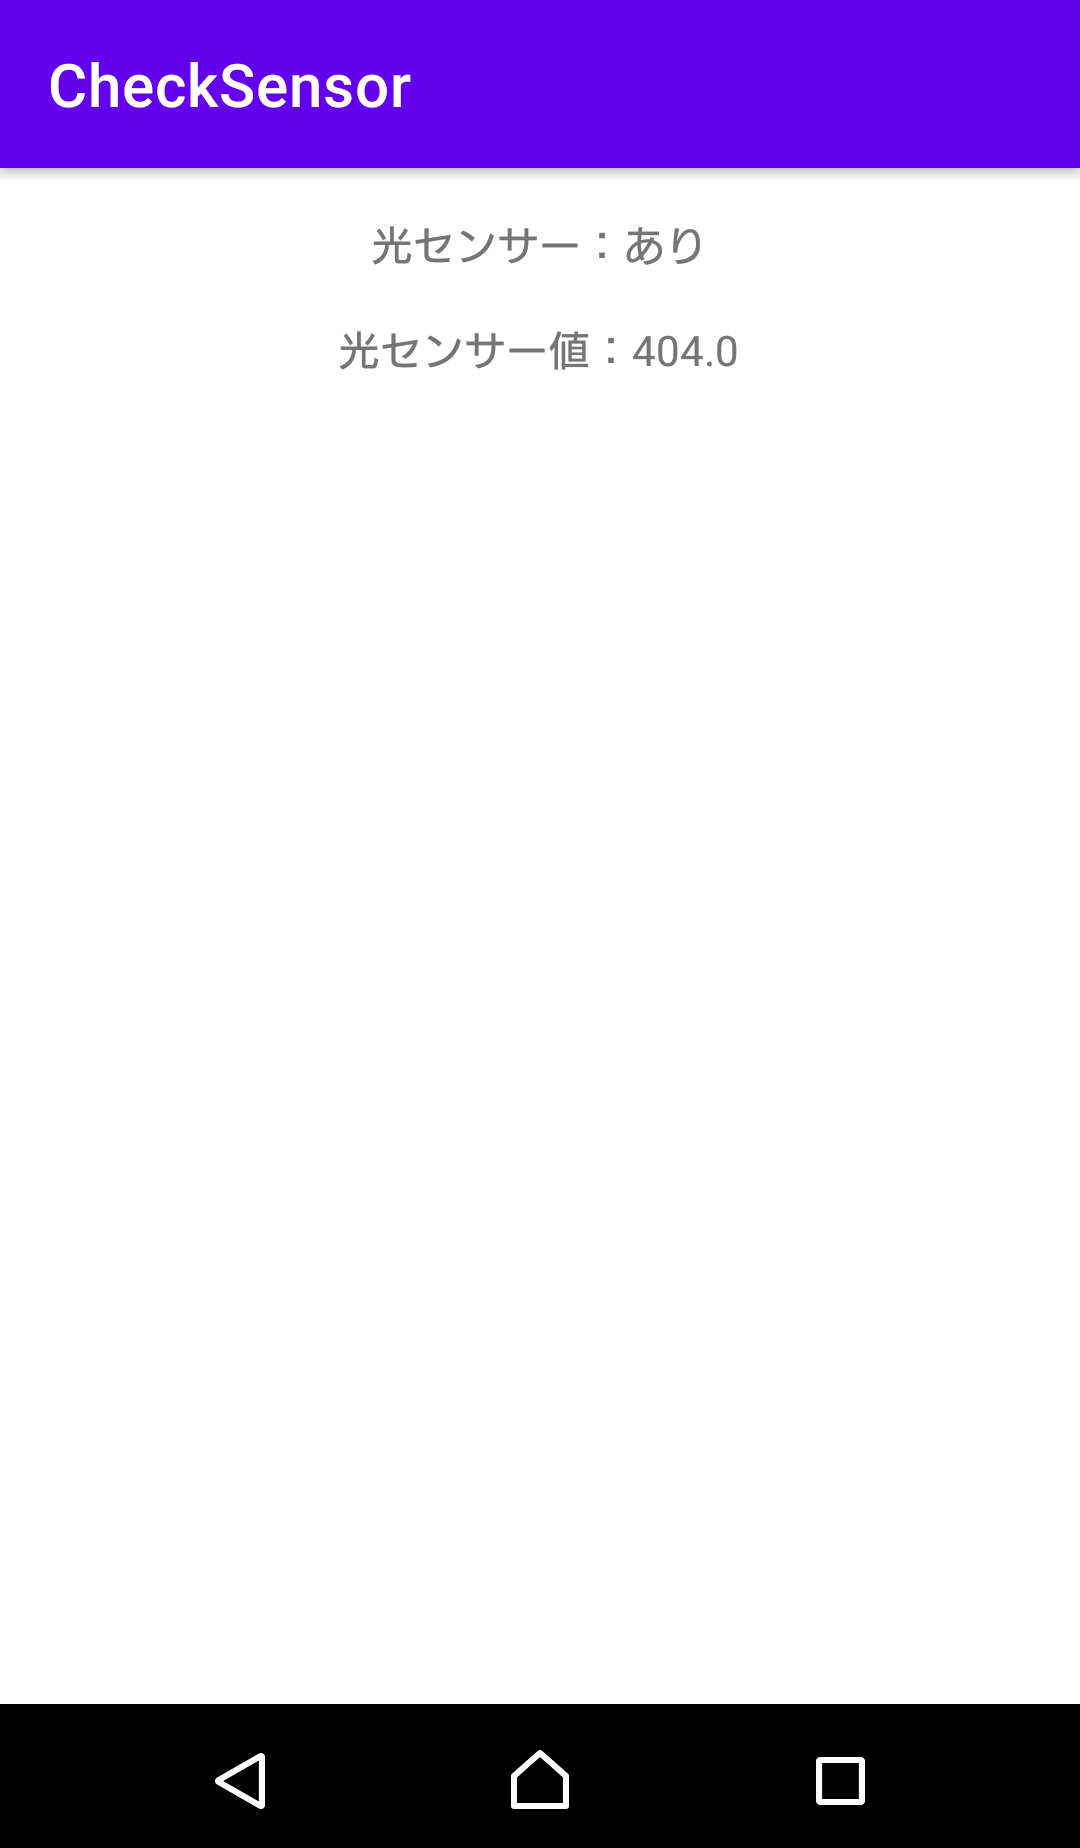
以下が動かしてみた結果。ちなみにセンサーはインカメラの近くについている。明るいところに置くと数値が大きくなり、暗いところに持っていくと0に近くなっていく。ちゃんと動いている。次回はいったんセンサーは置いといて、スマホのライト(トーチライト)をKotlinのコードで動かしてみたいと思う。
参考文献
今回は以下のサイトを参考にさせて頂きましたm(_ _)m
環境センサー | Android デベロッパー | Android Developers
センサーの概要 | Android デベロッパー | Android Developers
Androidアプリをつくって遊ぼう日記まとめ
以下にAndoirdアプリで遊んでみた軌跡を残しています。興味があればのぞいてみてください。
+1