【Android】スマートフォンの光センサー(輝度センサー)のセンサー値によりカメラのライトを点灯させる

投稿日:2021年1月23日
最終更新日:2021年1月23日

Androidスマホの光センサーで明るさを感知してライトを消灯/点灯させる

前々回はスマホの照度センサーのセンサー値を画面に表示した。そして前回はスマホのライトをボタンで点灯させてみた。今回はその2つの合わせ技で、センサー値が設定した閾値いかになったら(暗くなったら)ライトを点灯させてみた。


環境

開発PC環境

Windows 10
Android Studio 4.1.1

実行Android環境

機種:Xperia X Performance SOV33

Androidバージョン:7.0


Kotlinのコードとレイアウト

今回は参考文献のコードを参考に以下のようにKotlinのコードを書いた。例外処理など全然考慮してないが一応私の環境では安定して動いている。ライトを点灯させる閾値は実機の動作を見て20に設定しているが、閾値も画面上で設定できるようにしたらより便利かも。

package com.example.sensorlight
import android.content.Context
import android.hardware.camera2.CameraManager
import android.hardware.Sensor
import android.hardware.SensorEvent
import android.hardware.SensorEventListener
import android.hardware.SensorManager
import android.os.Build
import androidx.appcompat.app.AppCompatActivity
import android.os.Bundle
import android.os.Handler
import android.widget.TextView
import androidx.annotation.RequiresApi
class MainActivity : AppCompatActivity(), SensorEventListener {
private lateinit var sensorManager: SensorManager
private var mLight: Sensor? = null
private lateinit var manager: CameraManager
var cameraId: String = ""
var flashOn = false
@RequiresApi(Build.VERSION_CODES.M)
override fun onCreate(savedInstanceState: Bundle?) {
super.onCreate(savedInstanceState)
setContentView(R.layout.activity_main)
sensorManager = getSystemService(Context.SENSOR_SERVICE) as SensorManager
mLight = sensorManager.getDefaultSensor(Sensor.TYPE_LIGHT)
manager = getSystemService(Context.CAMERA_SERVICE) as CameraManager
manager.registerTorchCallback(@RequiresApi(Build.VERSION_CODES.M)
object : CameraManager.TorchCallback() {
override fun onTorchModeChanged(id: String, enabled: Boolean) {
super.onTorchModeChanged(id, enabled)
cameraId = id
flashOn = enabled
}
}, Handler())
}
override fun onAccuracyChanged(sensor: Sensor, accuracy: Int) {
}
@RequiresApi(Build.VERSION_CODES.M)
override fun onSensorChanged(event: SensorEvent) {
val lux = event.values[0]
findViewById<TextView>(R.id.textViewValue).apply {text =
"光センサー値:" + lux.toString()
}
if(!flashOn && lux < 20) {
switchLight()
} else if (flashOn && lux >= 20) {
switchLight()
}
}
override fun onResume() {
super.onResume()
mLight?.also { light ->
sensorManager.registerListener(this, light, SensorManager.SENSOR_DELAY_NORMAL)
}
val textViewExist = findViewById<TextView>(R.id.textViewExist)
if (sensorManager.getDefaultSensor(Sensor.TYPE_LIGHT) != null) {
// 光センサーがある場合
textViewExist.apply {text = "光センサー:あり"}
} else {
// 光センサーがない場合
textViewExist.apply {text = "光センサー:なし"}
}
}
override fun onPause() {
super.onPause()
sensorManager.unregisterListener(this)
}
@RequiresApi(Build.VERSION_CODES.M)
private fun switchLight() {
manager.setTorchMode(cameraId, !flashOn)
val flashStatus = if (!flashOn) "点灯" else "消灯"
findViewById<TextView>(R.id.textViewLight).apply {text = "ライトの状態:" + flashStatus }
}
}
view raw SensorLight.kt hosted with ❤ by GitHub

こちらがレイアウトのxml。

<?xml version="1.0" encoding="utf-8"?>
<androidx.constraintlayout.widget.ConstraintLayout xmlns:android="http://schemas.android.com/apk/res/android"
xmlns:app="http://schemas.android.com/apk/res-auto"
xmlns:tools="http://schemas.android.com/tools"
android:layout_width="match_parent"
android:layout_height="match_parent"
tools:context=".MainActivity">
<TextView
android:id="@+id/textViewExist"
android:layout_width="wrap_content"
android:layout_height="wrap_content"
android:layout_marginTop="16dp"
android:text="光センサーの有無"
app:layout_constraintEnd_toEndOf="parent"
app:layout_constraintHorizontal_bias="0.498"
app:layout_constraintStart_toStartOf="parent"
app:layout_constraintTop_toTopOf="parent" />
<TextView
android:id="@+id/textViewValue"
android:layout_width="wrap_content"
android:layout_height="wrap_content"
android:layout_marginTop="16dp"
android:text="光センサー値"
app:layout_constraintEnd_toEndOf="parent"
app:layout_constraintHorizontal_bias="0.498"
app:layout_constraintStart_toStartOf="parent"
app:layout_constraintTop_toBottomOf="@+id/textViewExist" />
<TextView
android:id="@+id/textViewLight"
android:layout_width="wrap_content"
android:layout_height="wrap_content"
android:layout_marginTop="16dp"
android:text="ライトの状態:"
app:layout_constraintEnd_toEndOf="parent"
app:layout_constraintStart_toStartOf="parent"
app:layout_constraintTop_toBottomOf="@+id/textViewValue" />
</androidx.constraintlayout.widget.ConstraintLayout>
view raw SensorLight.xml hosted with ❤ by GitHub


動かしてみた結果

以下が動かしてみた結果の動画。光センサーを隠すと、輝度が落ちてライトが点灯する。逆に光センサーに光が当たるようにすると、輝度が上がってライトが消灯する。

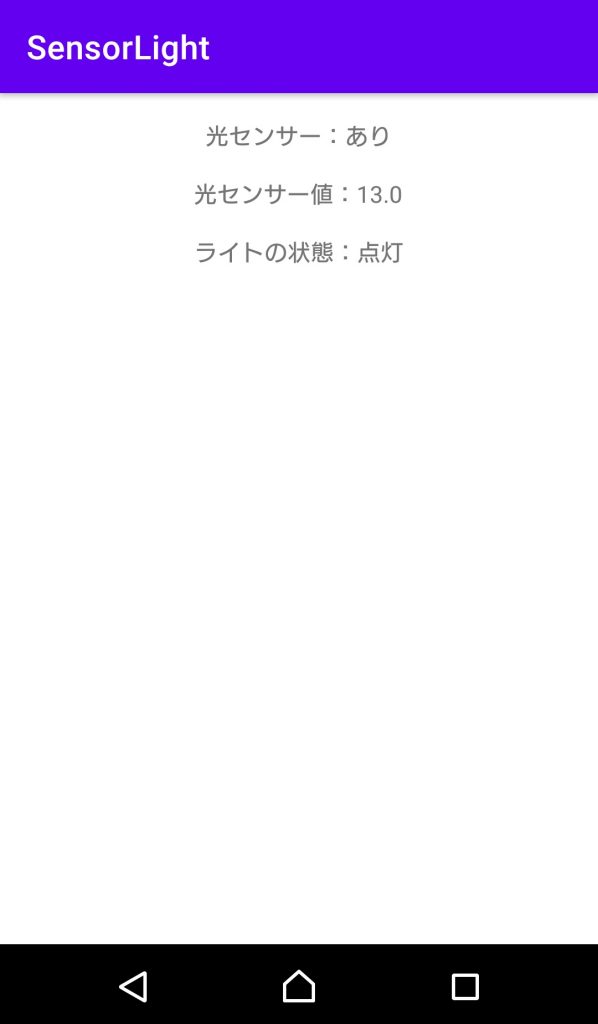
こちらが実行中の画面。ライトの点灯・消灯状況を表示するようにしてみる。

ちなみに、このアプリの起動中にスマホのデフォルト機能でライトを点灯・消灯させたりすると動作が不安定になる。もしアプリとしてリリースするならそのあたりをもっと少ししっかり作り込む必要があるとは思うが、ひとまず自分がやりたいことはできたので満足。


参考文献

今回は以下のサイトを参考にさせて頂きましたm(_ _)m

環境センサー | Android デベロッパー | Android Developers

センサーの概要 | Android デベロッパー | Android Developers

[Android] カメラのライト制御 (パーミッション不要)

1タップでライトをON/OFFする


Androidアプリをつくって遊ぼう日記まとめ

以下にAndoirdアプリで遊んでみた軌跡を残しています。興味があればのぞいてみてください。

【Android】Androidアプリをつくって遊ぼう日記

0

投稿者: wakky

映画と旅行が大好きなエンジニア。お酒、ゲーム、読書も好き。

コメントを残す

メールアドレスが公開されることはありません。 が付いている欄は必須項目です

このサイトはスパムを低減するために Akismet を使っています。コメントデータの処理方法の詳細はこちらをご覧ください